Blog
Microphone not working on Toshiba Satellite Laptop
A customer brought in a Toshiba Satellite Laptop saying that the microphone did not work on Skype. She went on to say that she was not sure when it stopped working but she had the screen replace a few months ago.
The microphone on most laptops is part of the webcam. In theory if the webcam is working then so should the microphone.
I took the surround off the screen and found this:
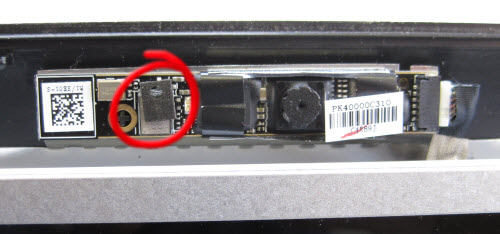
As you can see there is a piece of rubber with a hole in it that is not square on the microphone below. Therefore the microphone has been muffled by the rubber.
I removed the rubber to show the microphone hole:
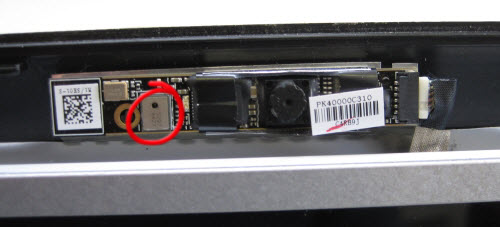 I then put the rubber back on with the holes aligned and all was well.
How to buy a used laptop
I buy a lot of laptops, some for spares and others to resell. Here are my top tips when buying a used laptop that you want to use for office work or for your children.
Appearance when closed
Scratches and stickers are not the end of the world
Scratches and stickers are not deal breakers but they give you an idea of how the laptop has been treated. A new lid for a laptop will cost £55 upwards to replace if it is particularly bad.
If the owner gets the laptop out of a bag or sleeve it is a good sign. The scratches could be from the charger sitting next to the laptop in the bag.
Please don’t assume the laptop is no good because it is scratched.
Look at the corners of the laptop, you are looking for deep scratches or chips. These marks could indicate that the laptop has been dropped. A dropped laptop should be avoided unless the price is right as internal connections can come loose and the hard-drive could be damaged.
Next, look at the ports and sockets. People can be very heavy handed when putting chargers and USB devices into a laptop. This is a good example of misuse.
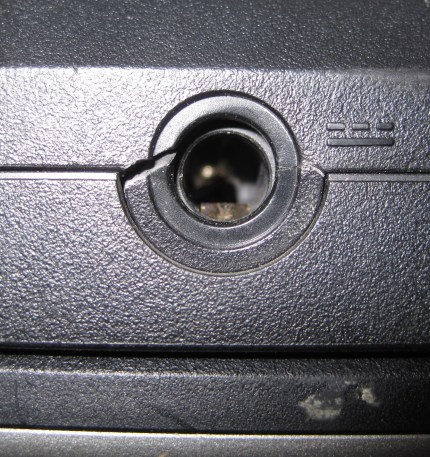
Charger socket pushed back and casing cracked

Left USB socket completely broken, right USB port has green plastic on?!
This laptop is an extreme example. Very rare that a power connector is forced backwards and the casing is cracked. This suggests that the laptop has been dropped with the charger in and probably a USB device plugged into the left socket. I bought this laptop for spares – screen and memory as hard drive could not be replied on.
Appearance when open
Open the laptop up.
 Again you are looking for visible defects. In this case it is clear that someone or something has been at the keyboard as there are many missing keys, a lot more than normal. You can also see a mark on the screen, find out if that is permanent or just muck. Look at the mouse keys, are they level with the case? Do they click when pressed and return to their correct position? Again look for marks where something could have been dropped on the keyboard or its surround. Look at the screen surround, the screws normally have rubber or vinyl covers on them, if you can see the screws then there is a good chance that the screen has been replaced, find out why it was replaced.
Turn the laptop on
Lightly press the power button. I say lightly as a worn out power switch can be a pain. Does the laptop start up into an operating system? Errors at this point could mean that the operating system has to be re-installed at best or that the hard drive has failed. Neither is a deal breaker but the price should be reduced for these issues.
Test the laptop
At this point I am assuming that the laptop has started and that you have a Microsoft Windows desktop in front of you. I am also assuming that the charger is plugged in.
Power and Charger: Is the laptop charging? There should be a battery icon at the bottom right of the desktop saying that the laptop is charging or that it is fully charged. If it says that the battery needs replacing then get the price reduced. Batteries on eBay go from £15 to £65.
Now remove the charger. What happens? If the laptop said it had more than 20% charge and the laptop shut off when the charger is removed then the battery needs replacing. Does the battery indicator stop saying that it is charging? It should.
Plug the charger back in. Does the laptop icon return to charging?
Does the charger connect well into the laptop. If you wiggle it does the laptop stop and start charging? If it does then a new charger (£6 to £30) may be required or worse still the power socket on the laptop needs replacing (£40+)
Look at the charger, what is the condition of the cable? Is the laptop plug a solid fit or is it wiggling from being pulled on?
Keyboard and mouse: Time to test the keyboard and mouse. Using the track pad lightly click on one of the desktop icons or the “Start” button. Again lightly so you can see if the button works well. Open up Notepad, Wordpad or Microsoft Word. Try as many keys on the keyboard as possible, try them with the <Shift> key. Make sure you try the <Enter>, <Arrow>, <Del> and <Tab> keys as these are really annoying if they do not work. Keys not working can be a simple issue (replace keyboard) or a deal breaker (Keyboard controller on motherboard failed, rare).
Whilst you are in Notepad, WordPad or Microsoft Word try left and right clicking with the track pad.
Screen: Are there any dead pixels, points on the screen that are the wrong colour. Not really a major issue but a very good negociating point. Are there any scratches, these show up best with a white background.
USB Ports: It is a good idea to take a USB Memory Stick with you when buying a laptop. Plug the stick into every USB port there is and make sure that the stick is shown in “My Computer”. If the computer switches off when the stick is plugged in it means there is a short in the USB socket. Reduce the price if the USB switches the laptop off or a USB port does not recognise that there is a memory stick plugged in.
WiFi: Make sure that the laptop can see wireless networks and that you can connect to at least one. Once connected make sure you can get a web page loaded. One like www.bbc.co.uk as the content is updated regularly.
If you can connect to a network but not load a web page then the laptop will need its settings looking at, nothing to worry about.
Sounds: There are two types of sound to listen for, ones the laptop is supposed to make and ones that it should not.
Sounds it should make include the Windows startup sound, sound through music and video and warning sounds. Any of these will prove that sound works. A quick test is to go onto www.youtube.com and watch a video. The video should play smoothly and sound should be in sync.
Sounds a laptop should not make are grinding sounds, a loud cooling fan and crunching sounds. Creaks on the screen hinges are ok. A loud cooling fan could mean that the laptop is running hot and will need cleaning out inside.
CD / DVD Drive: Take a music CD and a video DVD with you to test the DVD drive. Music should play and providing the laptop has DVD playing software the DVD should play. It is rare that a DVD player can play music CD’s but not play DVD’s so providing one of the two works all should be well. A new DVD write for a laptop is from £20 to £60. If the DVD drive is slot loading it is a lot harder to change as the laptop has to come to pieces.
Summary
Follow these simple checks when buying a used laptop and you will know what you are buying and more importantly you will be paying a fairer price if there are problems.
Red X through wireless indicator on Windows 7 but still connected to internet
A customer came in with a laptop running Windows 7. He thought he was not connected to the internet as there was a red cross through the icon at the bottom right of the screen that suggests no internet connection.When I clicked on the icon it showed that it was connected.
You could also load web pages and play videos on youTube.com
To fix this fault you have to use the registry editor as it looks like permissions get screwed up.
Click the “Start Button”
type “regedit” without the quotes and press enter.
Navigate to HKLM\SOFTWARE\Microsoft\Windows NT\CurrentVersion\NetworkList by clicking the following
- HKEY_LOCAL_MACHINE
- SOFTWARE
- Microsoft
- Windows NT <—- note that it is Windows NT
- CurrentVersion
Now right click on NetworkList and select “Permissions”
Click “Advanced”
Select “Everyone” or “SYSTEM”
Put a tick in the box “Replace all child object permissions with inheritable permissions from this object”
Click OK.
Restart your computer and all should be well.
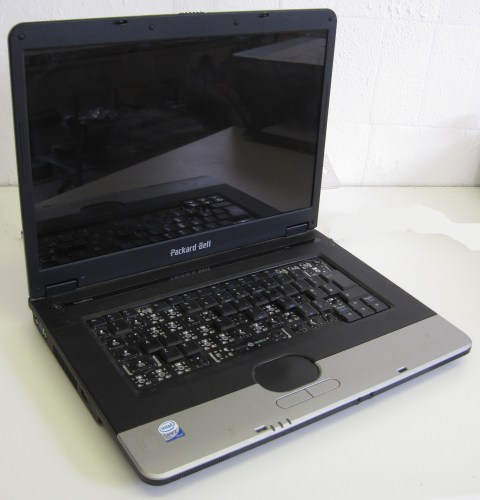
Acer Aspire 5536 Overheating
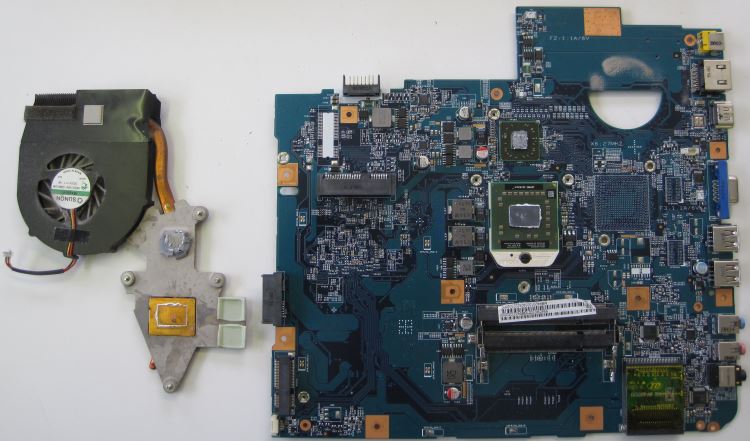
An Acer Aspire 5536 came into the shop today that had cut out whilst performing a Windows update. The laptop was running Windows 7 Ultimate with 4gb of memory. Although the laptop had been carried to the shop the case was very warm. When a processor gets too hot it will shut the computer off.
The main reason that a computer overheats is because the fan is clogged up with dust or the thermal paste which conducts the heat between the central processor and the heat sink has become dry and lost its conductivity of heat. As well as the central processor there is also a graphics processor that can also get too hot.
This article shows you how to take your Acer Aspire 5536, clean it and then re-apply thermal paste.
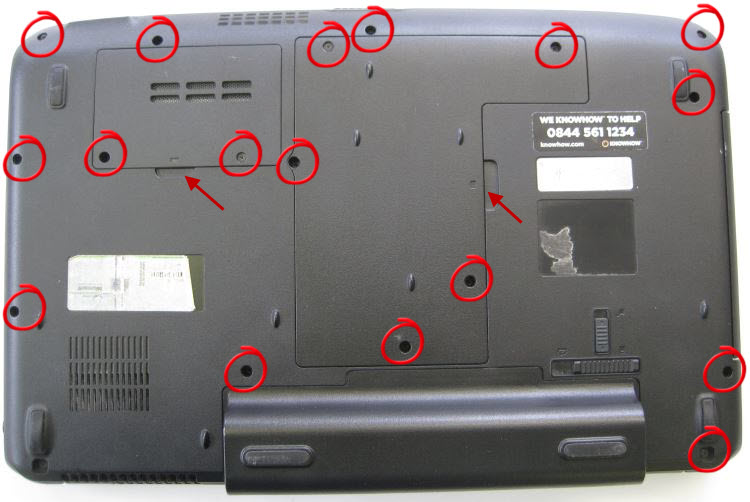
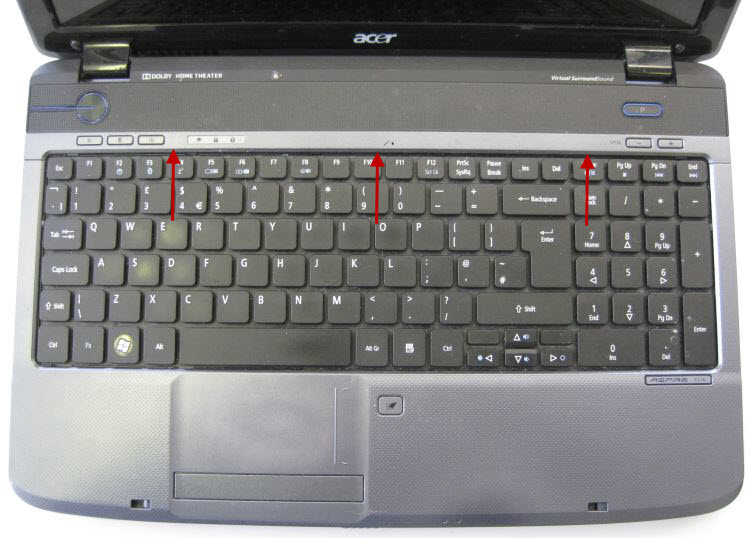
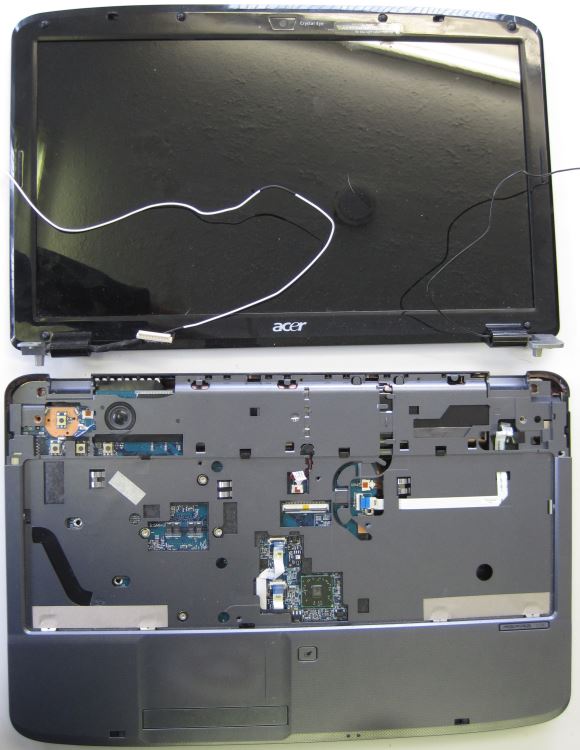
Undo all the screws circled and then prize the two covers away where shown by the arrows
Remove the battery.
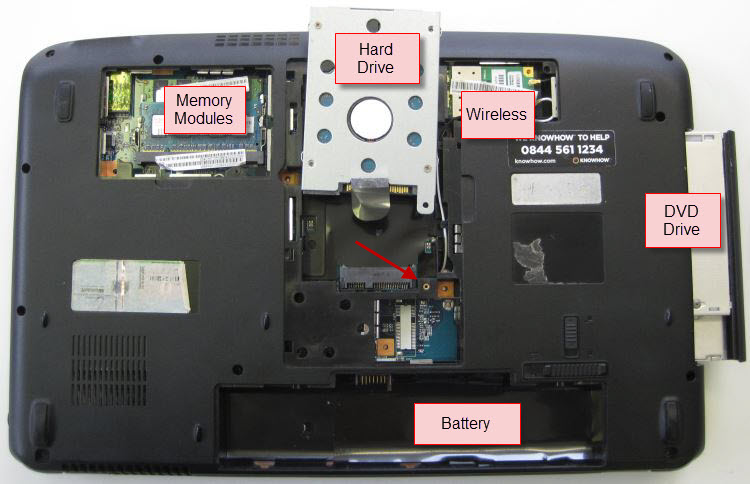
Remove the main components
Remove the main components from the bottom of the laptop. The DVD Drive slides out, the battery comes out using the two slides. The hard drive comes out by undoing the screw which the arrow is pointing at and then slides away from the screw. The wireless card is held in by a small plastic clip to the right of the card on this photo, move the clip to the right and the card will lift up. Then pull the wireless card to the right. Give the black and white wire a small pull and they will un-clip from the wireless card. The memory modules are removed by moving the metal clips either side of the modules away from the module, the module should then flip up and you can remove them.
Note: Always try to handle the memory modules at the edges.
All components removed from laptop
Remove top panel above keyboard
Using a small flat screw driver remove the top panel from above the keyboard. The panel is held in by little clips. I found using a small screw driver in the centre first worked best. Be careful not to break the panel or to flip it up to hard as there is a small ribbon cable underneath.
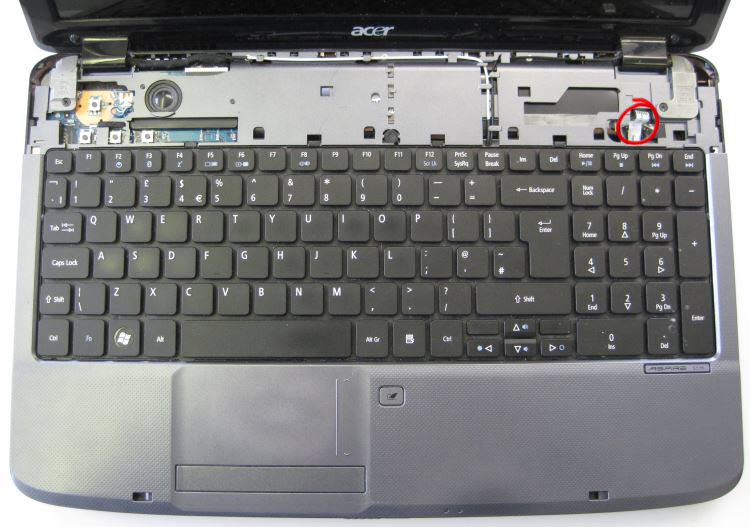
Acer Aspire with top panel above keyboard removed. Note ribbon cable circled, this is attached to the top panel
With the top panel removed you will see four clips at the top of the keyboard, using a small screw drive push them upwards. The keyboard will naturally rise as each clip is released. The keyboard is also held in each side, you need to flex the keyboard from the centre so you can lift it out. Again be careful as there is a ribbon connecting the keyboard to the laptop.
Keyboard retainers circled. Arrow points to connector of keyboard to laptop. The brown clip lifts at the bottom to release the keyboard
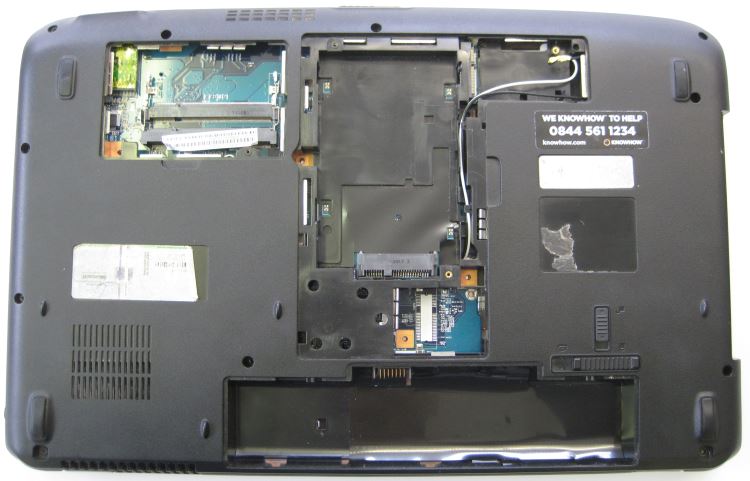
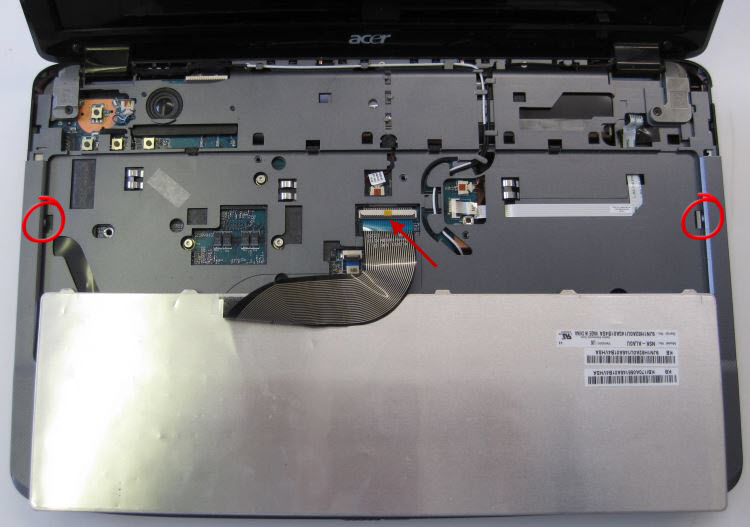
Undo the ribbons and cables circled from the laptop and undo the screws pointed to. The black and white cables need undoing, they used to connect to the wireless card underneath. Then undo the two screws (far left and far right) that hold the screen to the base. Hold onto the screen as you take the two screws out.
The screen and keyboard are now separate
The top of the base and the bottom should now separate, ideally use a plastic spludger so that the case does not get marked. If a spludger is not available then use a small flat screw driver. I normally start at one of the bottom corners.
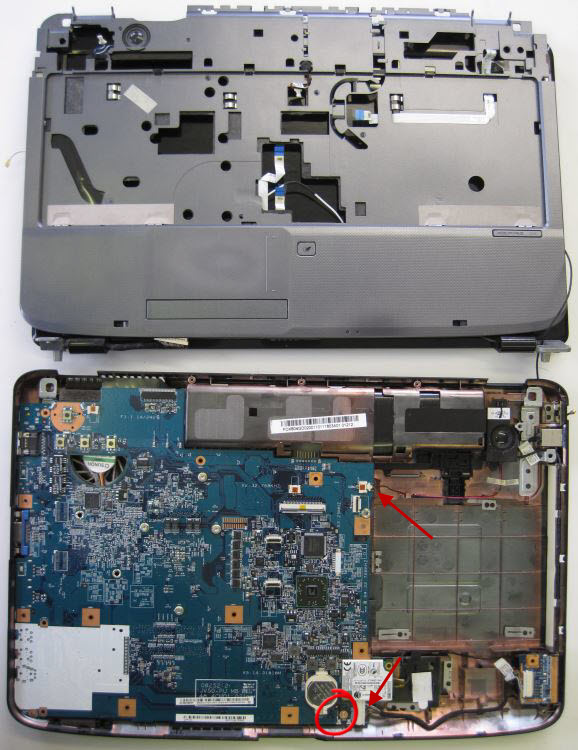
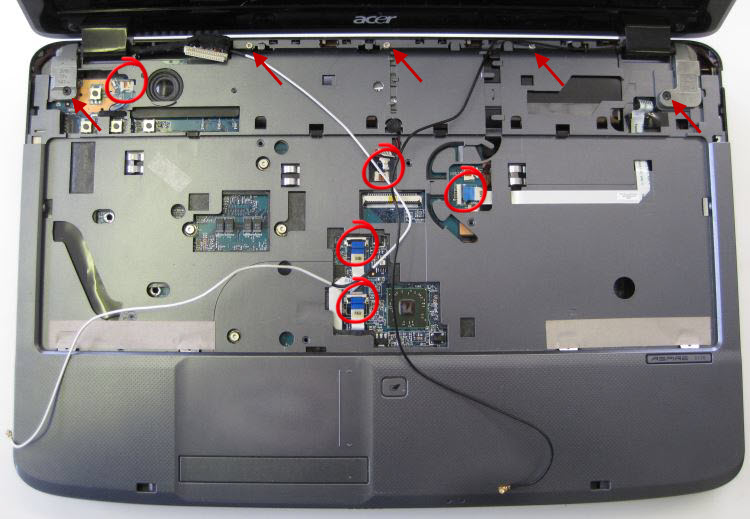
Remove the cables pointed to by the arrows and remove the screw circled
The motherboard should now come out. Lift the motherboard from the right-hand side.
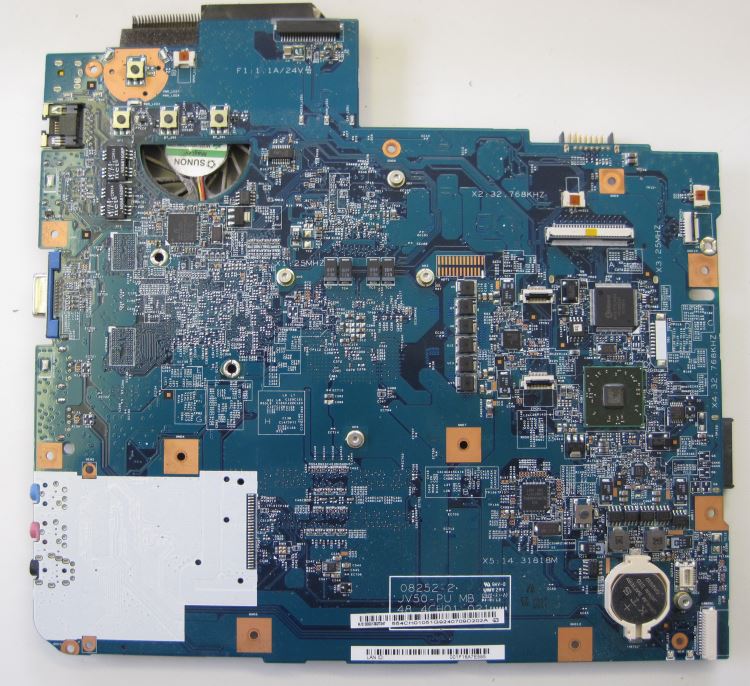
Motherboard removed from the laptop
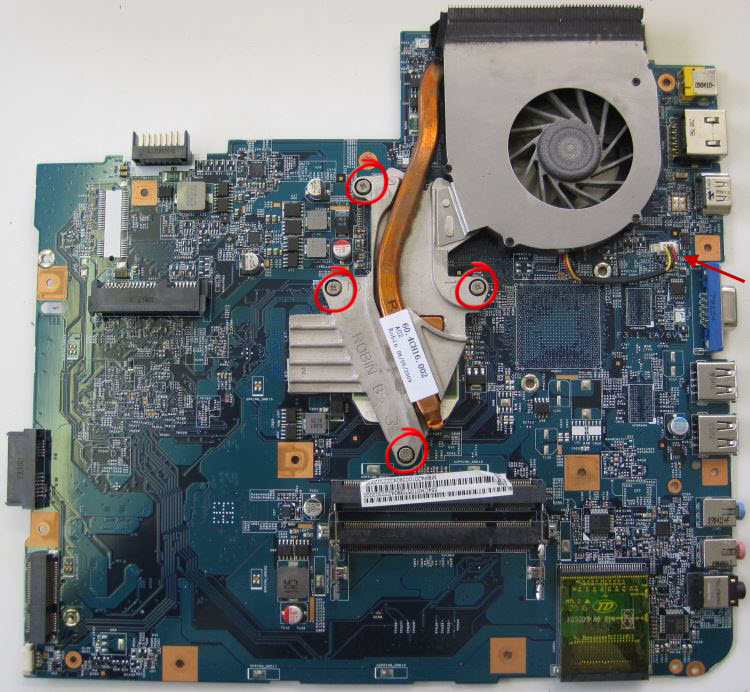
Motherboard from bottom. Pull the wire out that is pointed to and undo the four screws circled
Once all four screws are undone twist the heat sink gently clockwise and anti-clockwise, it should then release from the central processor.
Acer Aspire heatsink and fan removed from motherboard

Acer Aspire heatsink and fan showing dried thermal paste. The smaller block is for the graphics processor and you can see that the thermal paste is not even on the heatsink. Probably why this laptop was overheating.
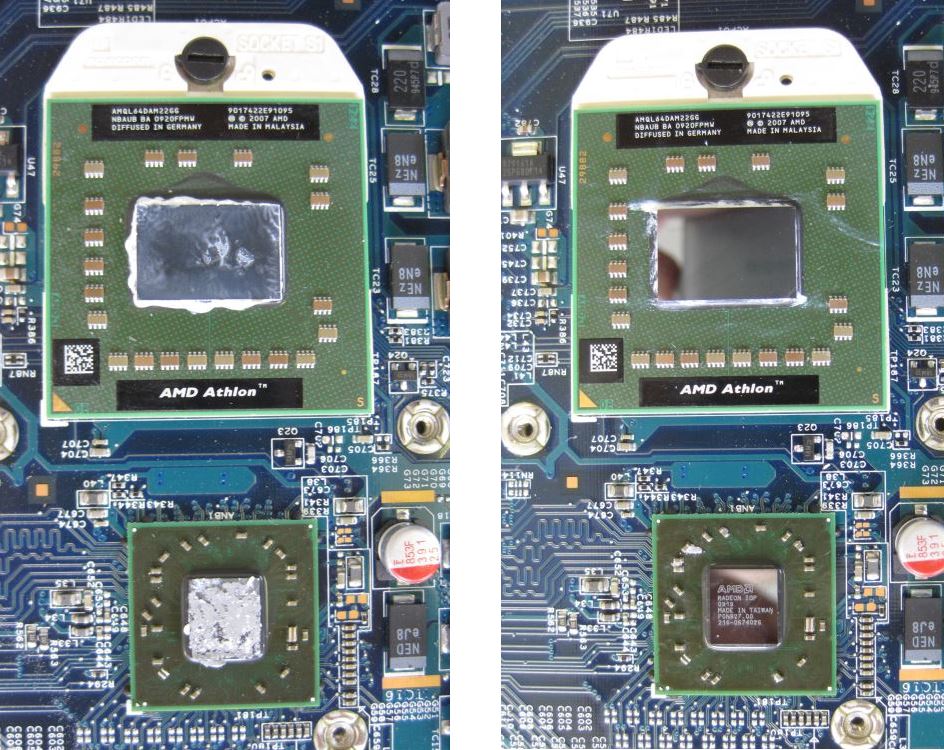
Acer Aspire central processor and graphics processor before and after cleaning

Using a paper towel or lint-free cloth remove the old thermal paste from both processors, you can use a cleaner fluid to help, I use TIM Clean
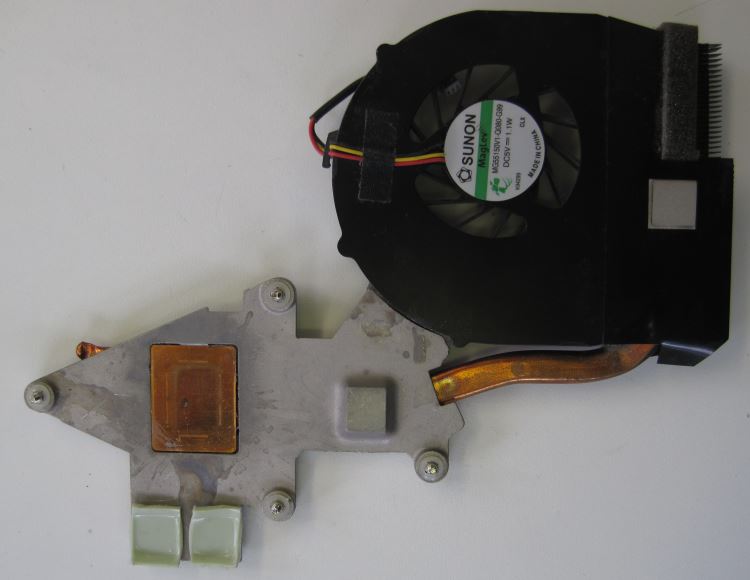
Acer Aspire heatsink and fan clean
Now that the heatsinks are clean you can apply the thermal paste to the central and graphics processor and reassemble. Make sure you tighten the screws on the heatsink in order and not too tight. Each screw has a number 1 to 4.
I have put all the photos in a zip file for you to freely use. Acer Aspire 5536 Original photos
How to sell your laptop and be safe
Thinking of selling your laptop or desktop PC? Then make sure that you do not leave any personal information on it. This article details a few ways to make sure your personal information does not fall into the wrong hands.
This article refers to a “computer” as a laptop or desktop PC running Windows XP, Windows Vista or Windows 7. This entire post is relevant to all three Microsoft operating systems. I will update the article once I have investigated that the article is applicable to Windows 8 though the same precautions should be taken.
Think about what you use your computer for. You write and save documents including your CV, a document containing a lot of very personal information. You may list your income and expenses in a spreadsheet or save your bank statements. You may store photos of your family and friends. You log on to your email, social networking sites and bank websites. You subscribe to websites and buy online. On a computer owned for 3 months or more there is more than enough information on it to make identity theft very easy.
Method 1: Selling to a family member
Log into every user on the computer and
- Delete all icons, files and folders from your desktop
- Delete all files and folders from My Documents
- Delete all pictures, images and other files from My Pictures
- Delete all videos from My Videos
- Delete all items in your Favourites folder
- Go to your internet browser (eg Internet Explorer, Firefox, Chrome etc) and delete your browsing history, set your home page to something safe like www.google.co.uk, restore default settings to the browser, delete cookies and form data (usernames, phone numbers, stored passwords etc)
- Go to your wireless connections and delete your home and office connections. You don’t want the buyer using your internet connection.
Now empty the recycle bin. Your computer is fairly safe to sell.
Method 2: Selling to a friend
This method creates a new “administrator” user so that you can delete all the other users which in turn should delete files, folders and history.
- Log into an existing “Administrator” user. If you are not asked to select a user when you log in then you can assume that there is only one user and it has “Administrator” access.
- From the “Control Panel” select “User Accounts”
- Select “Manage Another User”
- Select “Create a new user”
- Give the new user a generic username such as “Owner”, “User” or the make of the computer such as “HP”, “Dell”, “Toshiba”, “Acer” etc.
- Select the user type as “Administrator”.
- Log out or restart the computer.
- Log in as the new user that you have created.
- Again from the “Control Panel” select “User Accounts”
- Select “Manage Another User”
- Select in turn each of the other users.
- Delete the user, when asked if you would like to “keep files” select “No”. This should delete all files associated to the user. I say should as some files seem to linger.
- When only your new user is left go to the “Start” button and click “My Computer”
- If your computer is running Windows XP then select the “C:” drive, select the folder “Documents and Settings”. You will now see a list of users, hopefully just your new user. If there are other users then select each in turn and press the “DEL” button on your keyboard.
- If your computer is running Windows Vista or Windows 7 then select the “C:” drive, select the folder “Users”. You will now see a list of users, hopefully just your new user. If there are other users then select each in turn and press the “DEL” button on your keyboard.
Now empty the recycle bin. Your computer is safer than the majority of computers sold.
Method 3: Selling to someone face-to-face
Most modern computers have the ability to restore back to factory settings. Make sure you select the options that
- Format the hard drive.
- Removes all user data.
- Restores the computer to new, not to a previous point in time.
Don’t use the computer again!
Method 4: Selling privately or through a website such as eBay
This method wipes the entire hard drive and reinstalls the operating system. It is different from Method 3 as it allows you to delete the partition information from the hard drive. However you do need a Windows Installation disk to do this.
- Start the computer up from the Windows Installation disk. Do not start the computer up normally and then put the Installation Disk in as this does not delete enough information.
- Follow the prompts for an “Advanced Installation” or “Advanced Options”
- Delete all disk partitions.
- Let the installation create a new partition and format the hard drive.
- Continue the installation till the end.
Once the installation is complete then shut down the computer and do not use again, not even to check on your Facebook account!
Method 5: Sell to absolutely anyone!
This method is exactly the same as method 4 but you use a new hard drive and keep the old one. The benefits of this method is that no information on the hard drive is yours and never has been and that you get to keep your old drive with all your information on it. You never know what information is on your old computer that you may need in the future. Just get an external USB hard drive caddy/carrier/enclosure, plug the old hard drive into it and then plug it into the USB port of your new computer and you can access everything on the old hard drive.
Summary
If you are worried about selling your computer and are not confident enough to take the measures above then take it to a reputable computer expert. Make sure they understand that you want the disk partition delete and if you go for Method 5 then make sure the expert hands you back your old hard drive.
Methods 4 and 5 are my prefered options and is a service that I offer at BusiFix Computers
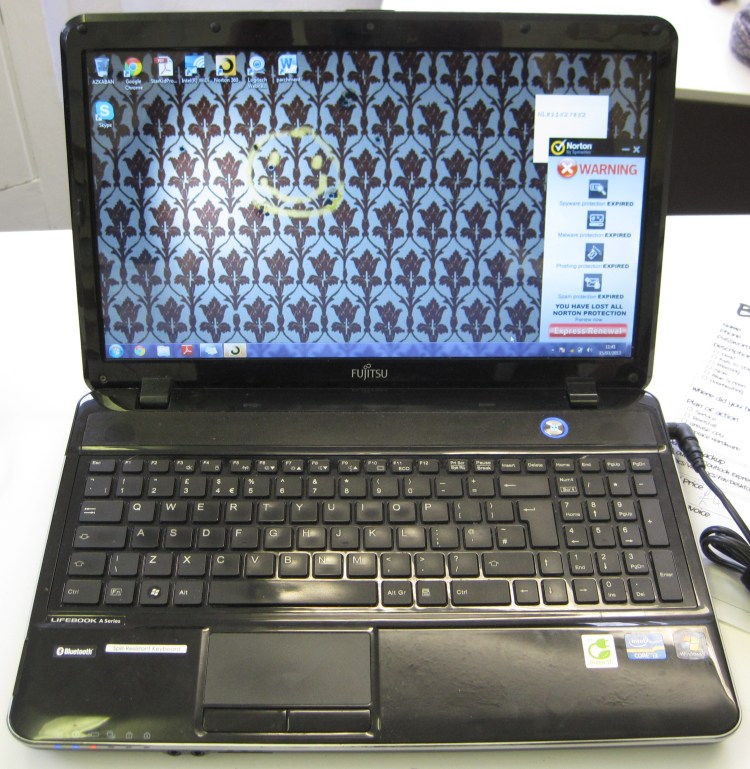
Fujitsu Lifebook AH531 Power Problem
This Fujitsu Lifebook AH531 came into the shop.
This was after the repair on a multi-charger
The customer used to have to wiggle the charger plug in the laptop to get it to work. The problem got worse and now the laptop is dead as it has no charge left in the battery.
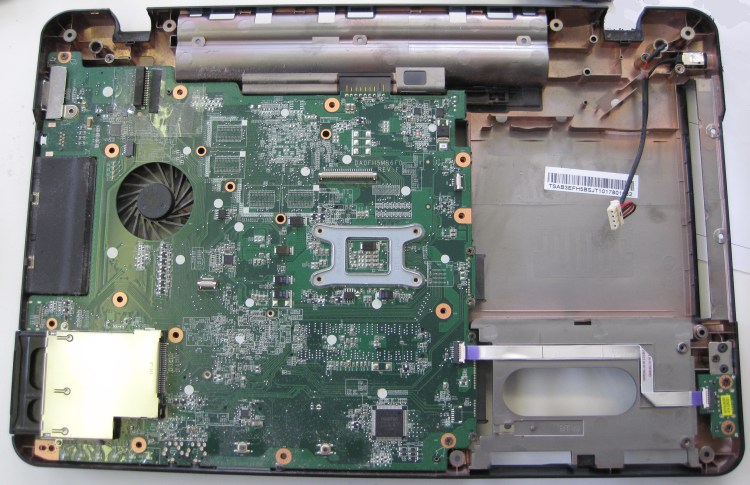
Laptop with top removed
In the photo above you can see the power cable on the right. I have disconnected the white plug from the motherboard. You can see that the red wire is not connected to the power socket.
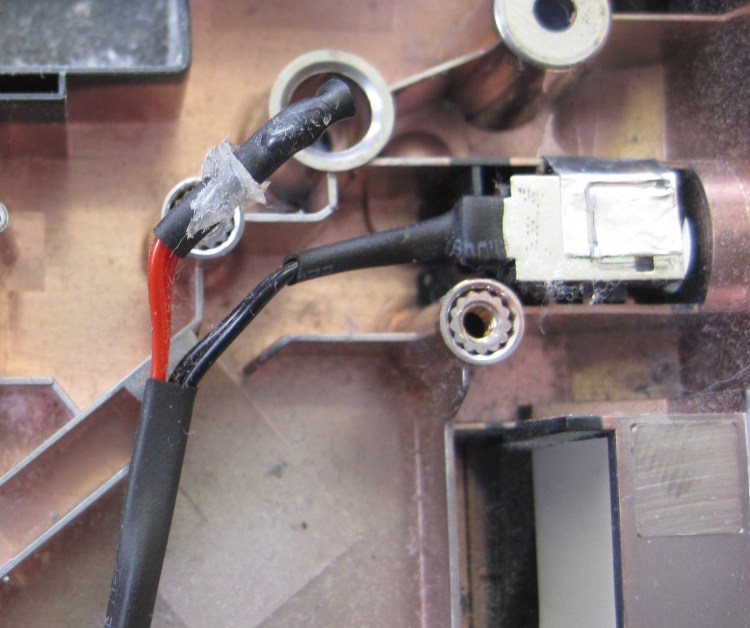
Close up of the power connector. The black plastic at the end is heat shrink.
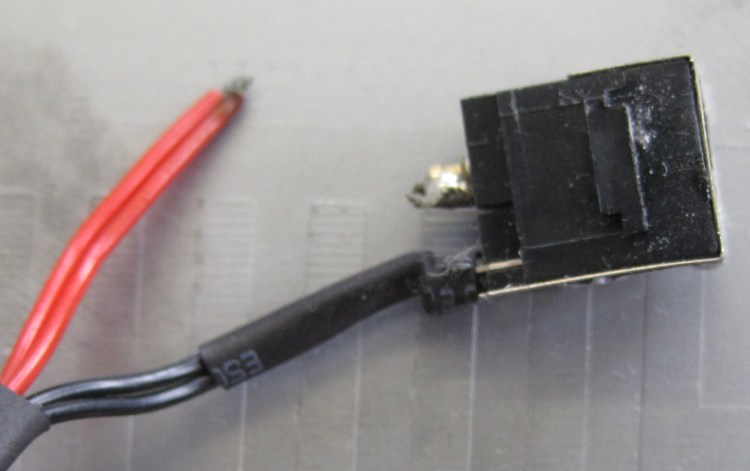
Close up with the heat shrink removed. Note that the end of the wire is burnt.
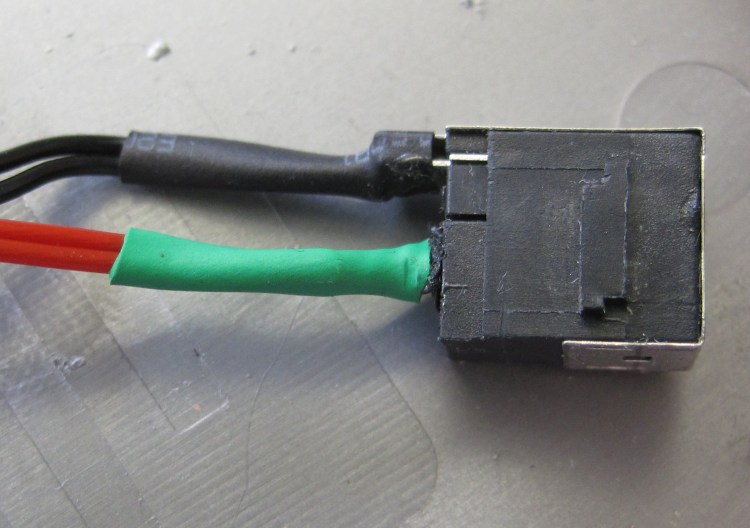
Repaired power connector. The green heat shrink protects the connection. The cable is soldered to the socket underneath.
When the laptop was put back together it would not switch on. I tested the charger which was outputting 20 volts correctly but the amp reading was very low. I then used a multi-charger and the laptop sprung into life. Remember the burnt cable? I can only guess that as the wire separated from the connector it damaged the charger. New charger ordered.
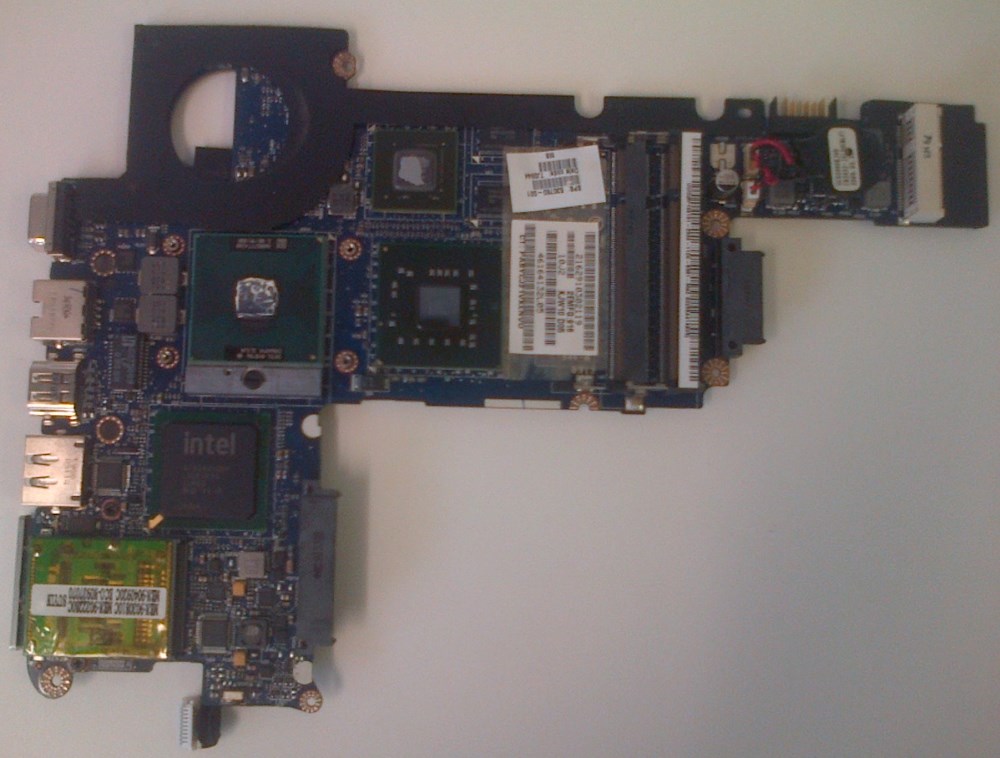
Inside a HP Pavilion DV3 laptop
This Hewlett Packard Pavilion DV3 laptop came in because it switches itself off after 20 minutes. My initial thought was that the laptop was overheating either by a stuck fan or a build up of dust.

HP Pavilion DV3
Inside the fan was spinning and there was no dust. After cleaning and reapplying thermal paste to the existing CPU there was no change. I then changed the CPU but the problem persisted. In the end I put it down to the motherboard or a component on the motherboard overheating. The photos below show what the laptop looks like inside.
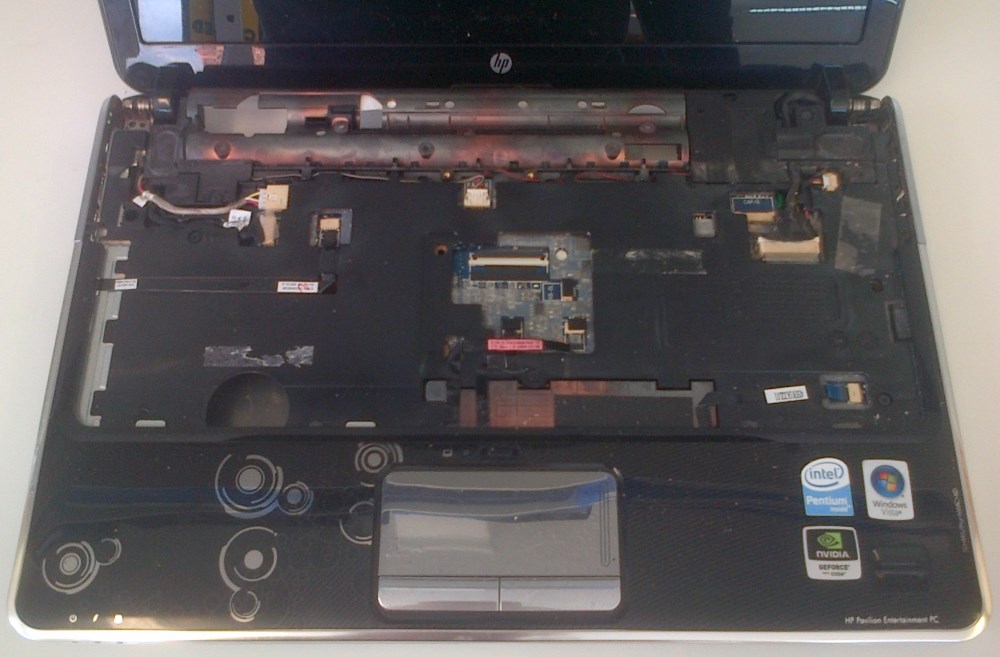
Keyboard and panel above keyboard removed

Keyboard, top panel and screen removed
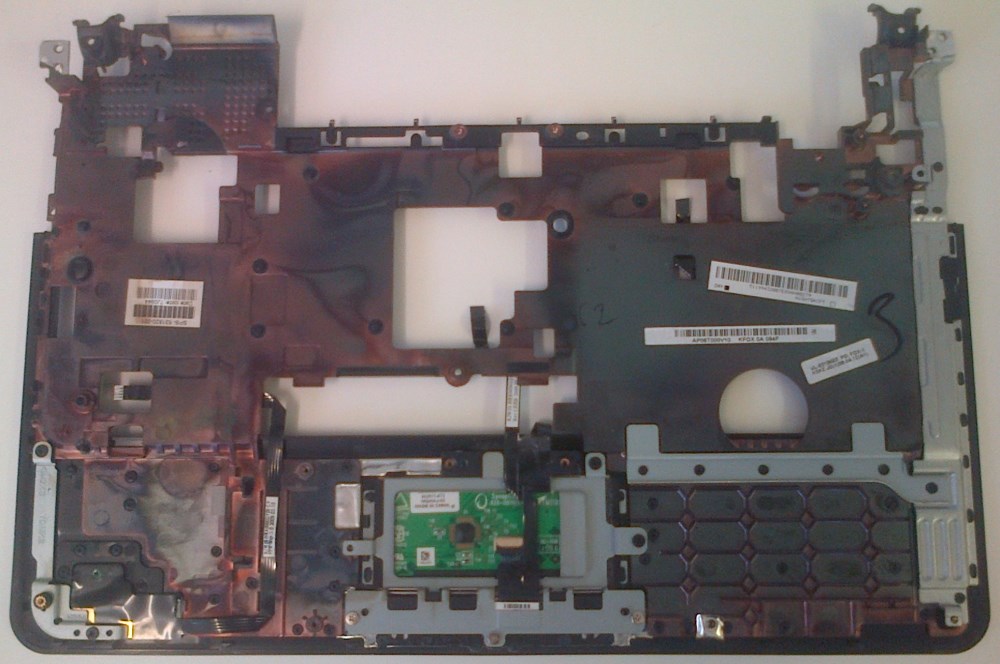
Underneath the top panel. Back of track pad is centre bottom.
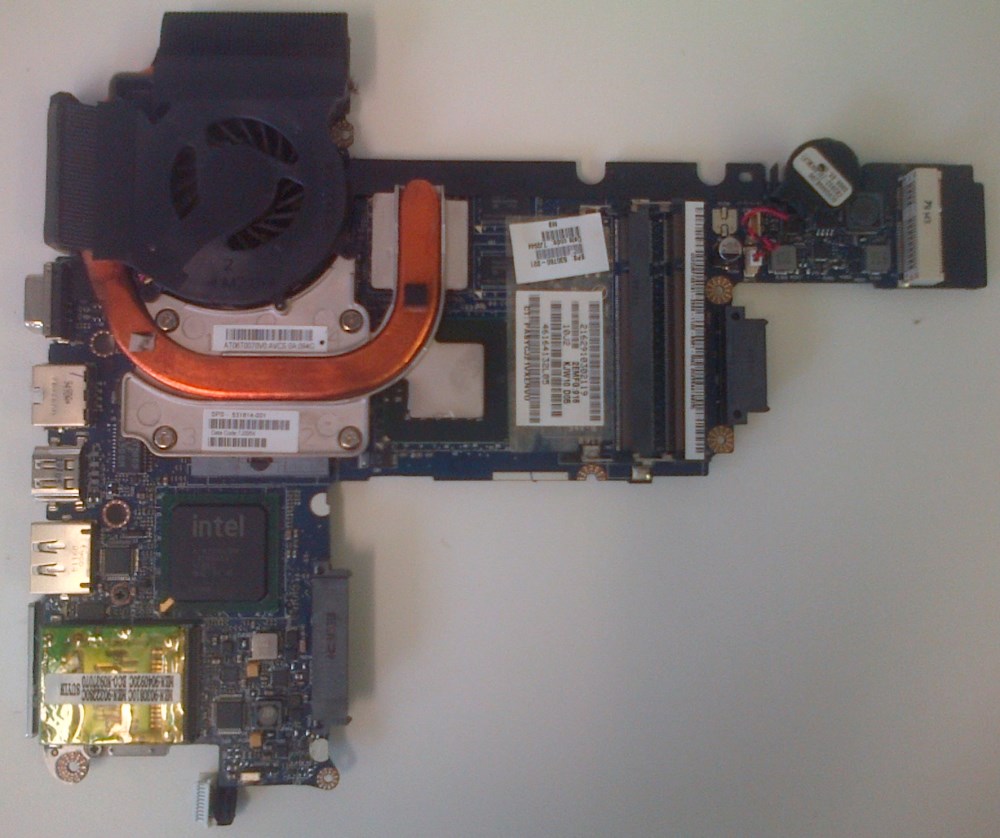
Motherboard removed from chassis – view from bottom with heat sink and fan removed.
How was my email hacked
I am sure you have all received an email which has random words in the title and in the body some random sentences and a link. You think it is suspicious but it comes from someone who emails you regularly. But the email does not look like it normally does. You guessed it your friend has had their email hacked and that account is now set up to spam their contacts.
Maybe it has happened to you. You either notice some failed delivery reports in your inbox or more likely one of your contacts tells you that they have received an odd email from you.
But how does this happen?
Well mostly it is down to using the same email address and password whenever you sign up for a website or for a newsletter. Using the same password as you use to access your email account!
Lets take the following example: You have an email address with Yahoo! for example . For this email address you use a password of SimplePassword23. At this point your email account is relatively safe.
However, you then perform as search for something that you are interested in, for men this could be cars and for women maybe shoes <– Sorry, sexist example, I have been rightly reprimanded! The website you find is very interesting so you decide to set up an account. When asked for your email address you enter and when it asks for your password your enter SimplePassword23.
Guess what, the owner of that website about cars or shoes now has access to your email account. They simply head over to Yahoo! and enter your email address and password!
Now it may not be the owner of the car or shoe site that wants to access your email account to send out spam emails to all of your contacts. It could be that the car site has very poor security and does not encrypt passwords or email addresses. Or that the shoe site has someone working for them who is not happy and is willing to sell on their employers database.
Your iTunes account is then not safe, if your login details are the same email address and password then you could say goodbye to the apps and songs that you have downloaded.
So my advice is simple, make sure your password, at least for your email account, is very different and more complicated than your usual password. One password for Yahoo and one for everything else that you sign up for.
Remember, once someone is in your email, Facebook, iTunes or anyother account they can change your password which then stops you getting into it.
Top Tip: Dating sites catch a lot of people out like this!
Signs have finally arrived
After a long wait, read funds, my signs are up and the shop looks like a shop.


Not all repairs are equal
A Toshiba Satellite Pro came into the shop today. It was completely dead. I took it to bits as I thought it would be a cooked motherboard. The motherboard had no signs of overheating and all the components looked in good condition. I then turned the board over to look at the processor and found this:
 This is a heat sink. Its purpose is to conduct the heat away from the processor. The orange copper bit was bent and distorted and had been glued to the actual heat sink. Glue is not a very good conductor of heat and has caused the processor to over heat. The damage to this heat sink was probably caused by the computer over heating before and this is the result of that repair. I am now going to hunt through my computer scrap yard to find a second hand one as this cannot be repaired. The computer now fires up but I cannot leave it on long to test as it does not have a heat sink protecting the processor.
Update to follow.

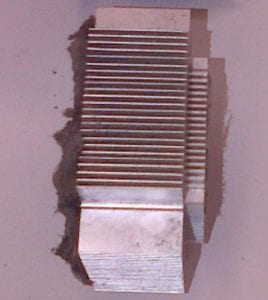
A replacement part has been found and fitted. The replacement part is on the left. You can see that the fins are straight and the copper tube is the correct shape. This tube has to be flat as it needs to fit flush to the silver heat sink. Heat will now be carried efficiently away from the central processor.
Inside a laptop
This is what a laptop looks like underneath the keyboard with the plastic frame removed.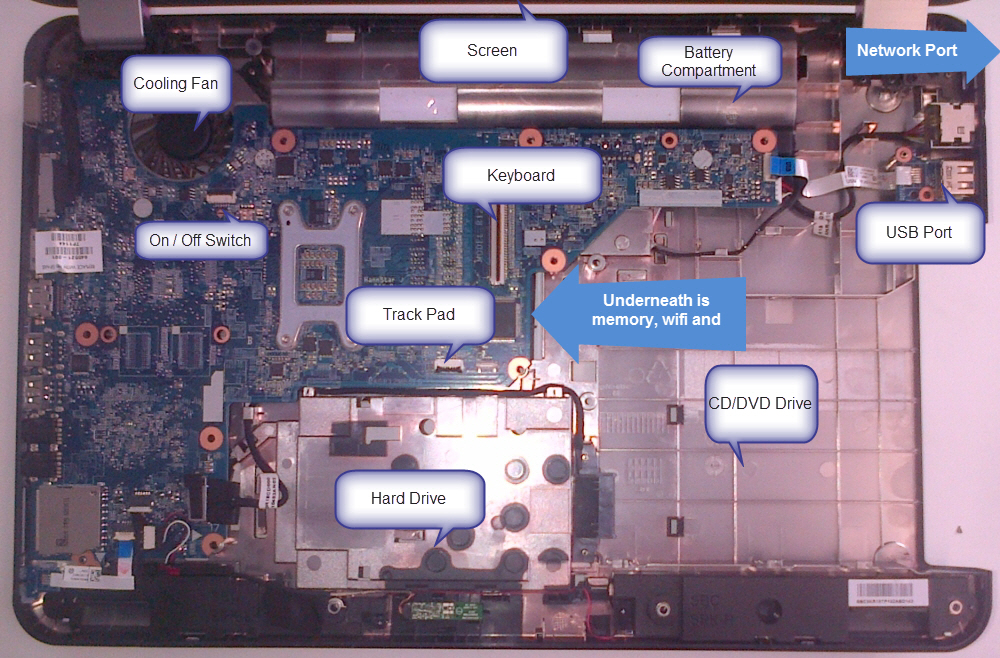
Dust examples in computers
Here are a few photos of dust inside computers and on components. Dust is removed when you bring a computer to me for servicing. As dust builds up inside a computer it limits the flow of air. This causes a build up of heat which will eventually cook either the processor, the graphics processor or the motherboard.
Dust on heat sink
 Dust on processor heat sink

The fan sits on the heat sink which sits on the processor
Inside case before a cleaning. Notice dust under the power supply at the top and in the fans
Exploding iPhone 3GS
A customer brought me an iPhone where the screen was being pushed away from the base and could not be put/forced back. The reason for this was that the battery had grown in thickness. Replacing the battery was not an option as the battery had caused the motherboard to bend and crack.
The thin silver block at the top is a new iPhone battery. The silver bag at the bottom is the exploding one
New cupboards
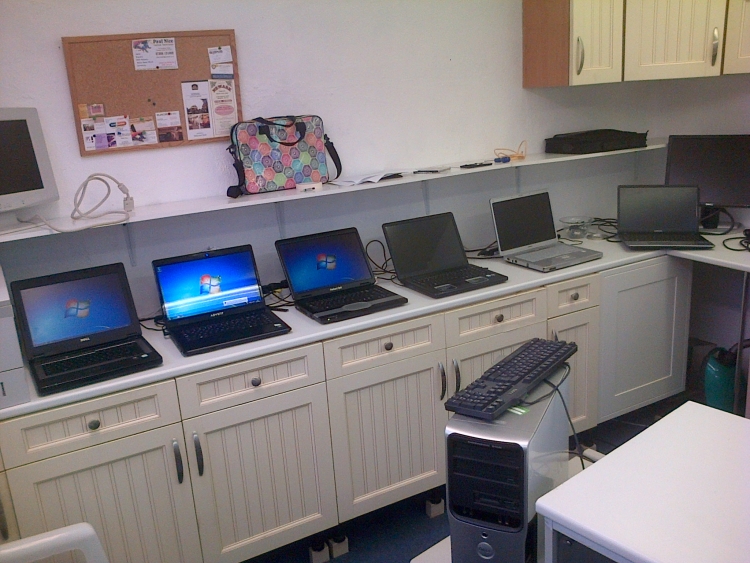
My shop is tiny and I need storage space. These cupboards have just been fitted along with extra shelving. I can now work on 8 laptops and 3 desktops at any one time. This reduces the time that you are without your computer.
Broken Power Connector
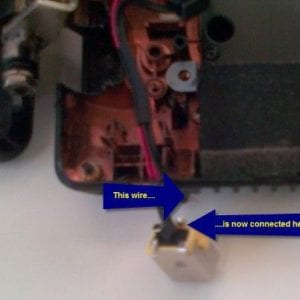 Customer brought in a laptop that would not power up using the power cable. Once the laptop was taken to bits it was clear that one of the wires was not connected to the power socket.
A simple solder rectified the problem and the customer was charged just £20.
Screen not connected to laptop
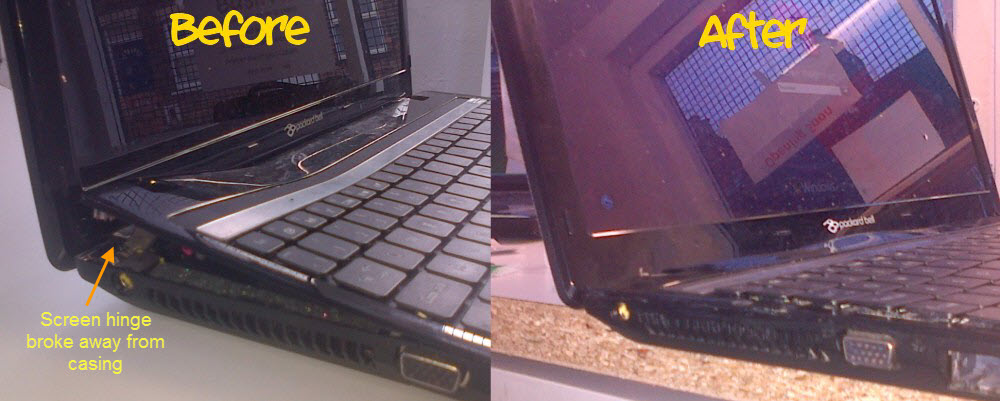
Laptop came in and would not close. this was caused by the laptop being dropped breaking part of the plastic case inside. The fix involved glue, a longer screw and the removal of the broken components from inside the case. The charge was just £20 to fix.
Illegal Activity Has Been Detected
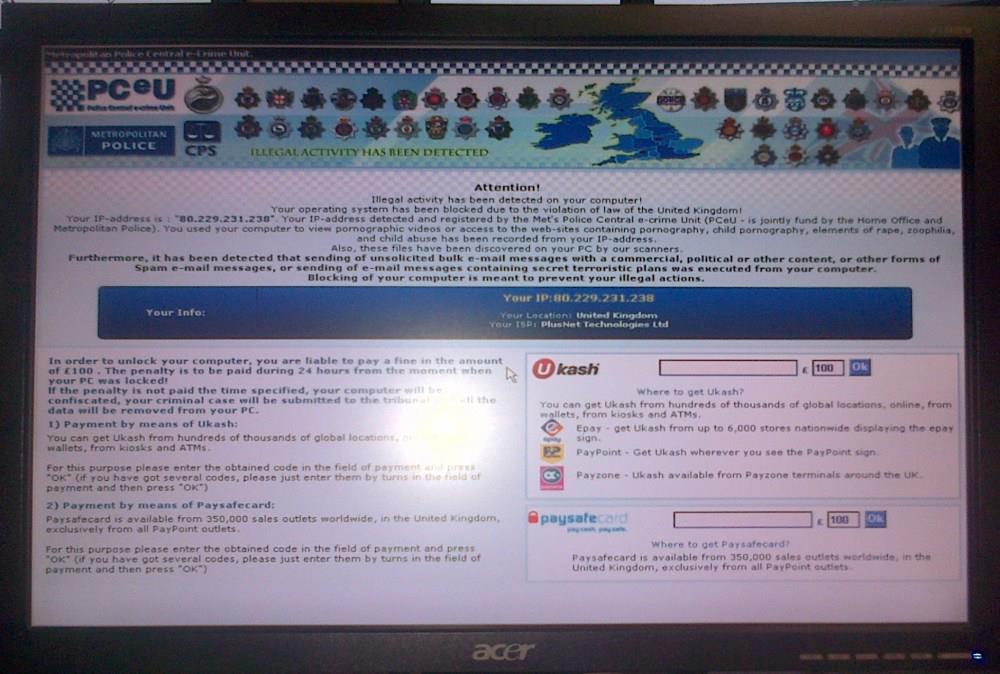
This is scare ware! It is trying to blackmail you for your money. You cannot do anything with your computer. Ctrl-Alt-Delete does not work. Safe mode does not help you. The only way that you can get rid of this is to pay the required amount which starts at £50. The computer will then be useable again…… for a few weeks and then it happens again.
Update:
I have now seen this three times and as part of a computer service it will be removed.
First customer!
I still do not open till Thursday which is the day Virgin put broadband into the shop. However I went to the shop today to start getting organised and whilst there a customer brought me two laptops and I got a serious enquiry through my Facebook page, cool!
The two laptops which came in have very different problems though both are Toshiba’s. The first has a cracked screen but the second one ahas a virus. The virus pretends to be from the police e-crime unit. It stops you going on the Internet, prevents installation of new software including antivirus products and also prevents the task manager from running.
A quote has been put together for a new screen and the virus has been removed. Just doing a spring clean to improve the performance of the laptop though it is Vista so not hoping for a massive speed increase!
Lease, Keys, Time to start!
I have the keys for the shop now! I have ordered broadband and have started preparing for a fresh coat of paint. Broadband should be installed on Wednesday 14th November.
The former tenant has kindly left an old counter that I think I can use, it has a glass front and with some lights I think it will look good. I still need some metal work to protect the glass in the front door. Hopefully ebay will provide an already build security frame.
It felt good taking down the ‘To Let’ board today. Newark Property Management have been very helpful and quick sorting out the property for me.
Update:
Broadband will be installed on 15th November 2012.
Artist(?) mockup of new shop

This is how I hope the shop will look after some signs are put up. The shop is small inside but ideal for fixing computers and laptops. There is free road parking on both Barnby Gate and Wood Street. Lots of work to do…
No Results Found
The page you requested could not be found. Try refining your search, or use the navigation above to locate the post.